How to use Gemini CLI with the Control Panel

AI chatbots are becoming impressively advanced, especially when it comes to writing code.
In fact, we’re starting to see entire software projects built solely by AI – what some people are calling “vibe coded” apps, because they’re created entirely based on prompts and AI-generated logic.
Although our Hepsia Control Panel doesn’t currently offer built-in AI integration (at least not yet), you can still harness the power of AI to help with your development.
One option is to manually copy and paste code generated by tools like ChatGPT or Gemini, though we admit that can get a little repetitive.
A smoother approach would be to set up the Gemini CLI and connect to it over SSH, giving you direct access to AI-assisted coding right from your terminal.
Why use Gemini CLI instead of Gemini?
While the standard Gemini interface (like the one you might use in a browser) is great for quick questions or generating code snippets, the Gemini CLI (Command Line Interface) takes things to the next level, especially if you’re working on real coding projects.
Gemini CLI lets you interact with Gemini directly from your terminal or your favorite IDE using simple commands. This isn’t just a more convenient way to use AI – it’s a smarter one.
When set up properly in your development environment, Gemini CLI can access your actual project files. That means it can read, modify, and even create files automatically.
This deeper level of integration allows Gemini to generate much more accurate and context-aware code, whether you’re debugging, refactoring, or building something from scratch.
It’s like having an intelligent coding assistant that sees the bigger picture, not just isolated pieces.
How to set up Gemini CLI?
To get started with Gemini CLI, you’ll need to have a few things set up in your account:
- ✅ An available Supervisor instance
- ✅ SSH access to your hosting environment
Step 1: Create a Supervisor Instance
In your Control Panel, go to: Advanced → Supervisor:
In your Control Panel, go to: Advanced → Supervisor:
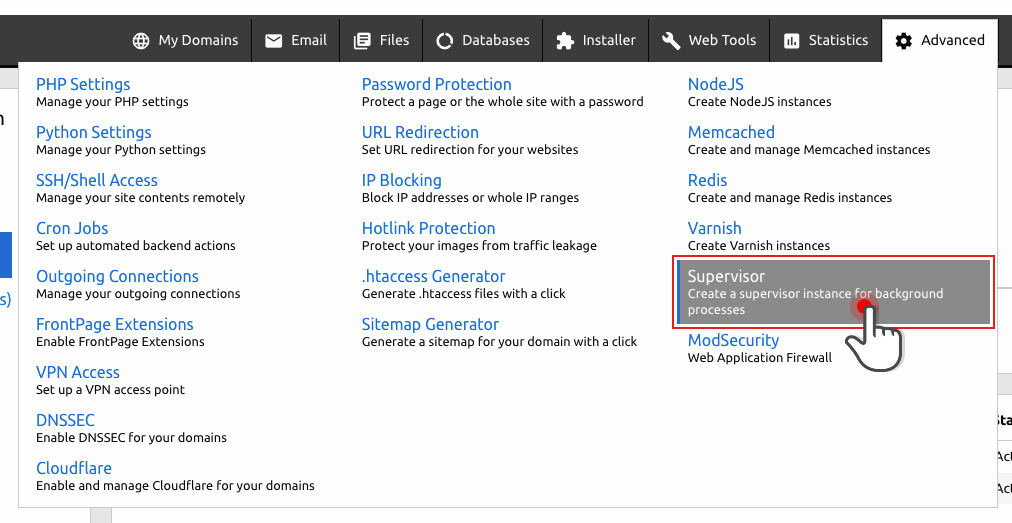
Click the "Create Instance" button:

A setup dialog will appear where you’ll configure the new instance:
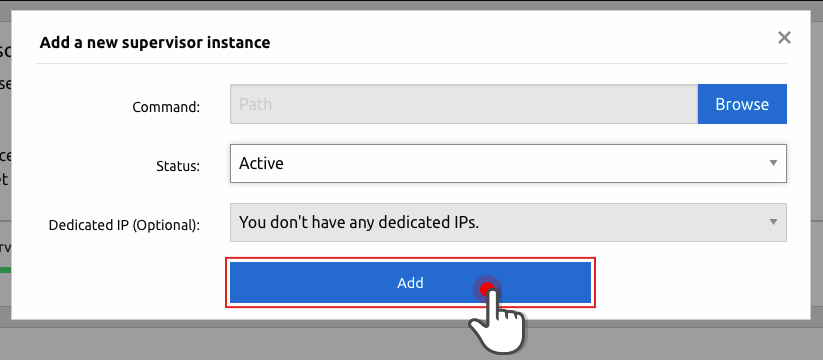
Here's what to keep in mind:
- In the Command field, specify the full path to the folder you want Gemini CLI to work with.
- For example:
my-best-domain.com/cars/ford Important: Gemini will only have access to this specific path and its subdirectories (e.g., …/ford/fenders). It won’t be able to access higher-level folders like …/cars.
 - Make sure to note the port number assigned to your Supervisor instance – you’ll need it later when configuring Gemini CLI.
Step 2: Connect to Gemini CLI
With Supervisor set up, it’s time to run Gemini CLI.
To use Gemini, you’ll need an API key from Google:
- Go to Google AI Studio
- Click the “Get API Key” button in the top right corner

Connect via SSH
Open an SSH session using your preferred SSH client, or use WebSSH directly from your Control Panel.
Open an SSH session using your preferred SSH client, or use WebSSH directly from your Control Panel.
Navigate to the directory where you set up Supervisor.
Set up a Node.js environment
Once you’re in the correct path, run the following commands to set up a temporary Node.js environment:
Once you’re in the correct path, run the following commands to set up a temporary Node.js environment:
nvm install v24.4.0

nvm use v24.4.0
NOTE: This is not a “true” Node.js instance so it will not count toward your Node.js instance limit.
Authenticate Gemini CLI
Use this command to set your API key in the session:
Use this command to set your API key in the session:
export GEMINI_API_KEY="your_api_key"
(Replace your_api_key with the actual key you got from Google AI Studio.)
Start Gemini CLI
Now, it’s time to launch Gemini. You’ll need to specify the port number assigned to your Supervisor instance when you created it:
Now, it’s time to launch Gemini. You’ll need to specify the port number assigned to your Supervisor instance when you created it:
AUTH_CALLBACK_PORT=29327 gemini🔧 Replace 29327 with the port number from your Supervisor instance.
This will start up Gemini CLI:

Important: If you don’t specify the correct port, Gemini will attempt to use a random one, which can break the authentication process.
You’re all set!
Once Gemini CLI starts, you can begin using it just like the regular Gemini chatbot – but now, it’s working with real files and real context from your project directory. You’ve essentially turned Gemini into a powerful AI coding assistant that understands your actual codebase.
Hepsia Control Panel
 Take a peek at the live demo and take a look at our tools we give you to control your sites.
Web Accelerators

Improve your site's speed with the assistance of our in-built tools.
1-click Installer

Install more than 50 popular site apps with a single click.